A question that haunted me when I started my machine learning journey is what to do once I am satisfied with my model’s performance. For building a portfolio, I think it is important to showcase your developed models as machine learning applications. With this, you can share your work online and let people interact and play with your model.
If you just want to try out my demonstration app, click the image below:
Let’s breakdown the process into two steps:
First is the application development. For this, we will use streamlit. Streamlit is a python library that provides you easy to use modules to quickly build a simple web application. It will handle the user interface and basic application logic.
The second part is deployment. There are multiple ways, but the easiest experience for me is using HuggingFace Spaces. HuggingFace develops the Transformers library and hosts a large repository of datasets, models (and their weights) and demo pages called spaces.
In this article I will discuss how I built a simple demo of a machine learning model using Streamlit and deployed it to HuggingFace.
Prerequisites
Only basic Python and Git knowledge is needed to create this web application.
Install the streamlit library to the python environment where you developed your model.
pip install streamlitInstall Git in your local machine. This will make it easier to make changes to your deployed application.
Create a HuggingFace account. This is a free service.
Initializing a New Space
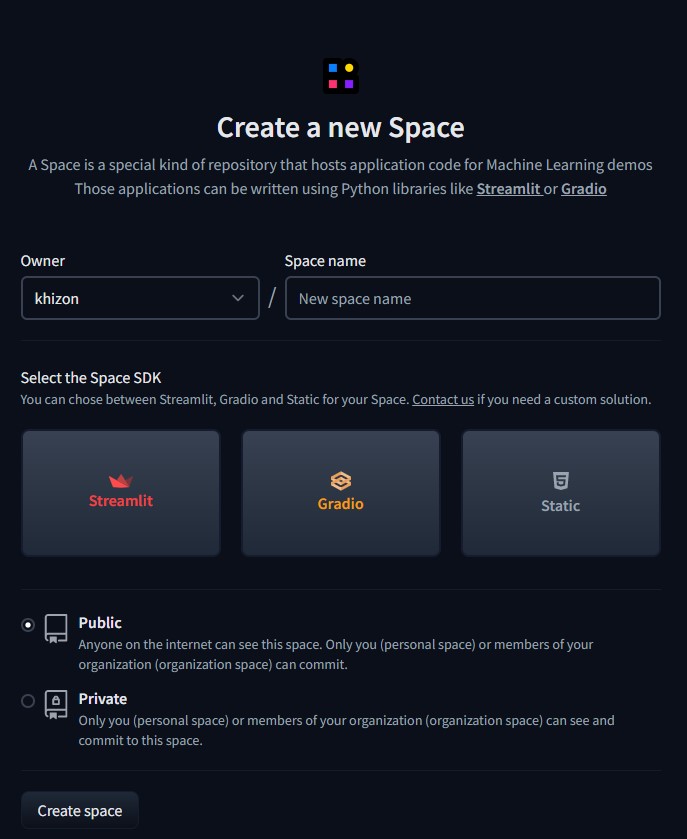
Once logged in to huggingface, click your profile picture on the upper right side, and choose New Space. This will bring you to a new page. Give your space a name, and click the Streamlit icon as the SDK. Finally, click the Create Space button.

This will initialize a repository. Once you have updated the repository with your own code, HuggingFace will take care of the deployment and hosting.
Developing Your Machine Learning Application
To get started, clone the spaces repository to your local machine using the following command:
git clone https://huggingface.co/spaces/your-user-name/your-space-nameOpen, the folder on your editor of choice, and locate the app.py file. Streamlit will basically run this file on an infinite loop. There are some sections of the code that doesn’t need to be repeated everytime. I will show you the needed modifications to skip them on subsequent runs. I have imported all the libraries needed by my model. Additionally I imported the streamlit library.
import streamlit as stIn this example, I will be creating a test demonstration for a Greek Speech Emotion classifier. For simplicity, I will be skipping over the development of this model and would just be loading the model weights from HuggingFace. Additionally, this model would also not take input examples from the users but would just randomly pick a sample from the test dataset to run inference.
We would not be committing the data files along with the code as the audio data set was quite large. With that, we need to add code that will instruct the application to download the dataset from the online storage. We will also create logic such that the application will not repeatedly download the dataset on subsequent runs.
if not os.path.exists('/home/user/app/aesdd.zip'):
        os.system('python download_dataset.py')
During development of the model, I have already created a script that will download, extract and pre-process the dataset. Inside the app.py file, I call this script using the os.system method. I create an if-statement, such that if the compressed version of the dataset is already on the file system, the download process will be skipped.
Download the model weights
Next would be caching the model weights. The model weights are also hosted in HuggingFace, and it still takes a few seconds to download them. In our app.py, we defined a new function that will handle this model weights initialization process.
@st.cache(allow_output_mutation=True)
def cache_model():
    device = torch.device("cuda" if torch.cuda.is_available() else "cpu")
    model_name_or_path = 'khizon/greek-speech-emotion-classifier-demo'
    generic_greek_model = 'lighteternal/wav2vec2-large-xlsr-53-greek'
    config = AutoConfig.from_pretrained(model_name_or_path)
    processor = Wav2Vec2Processor.from_pretrained(generic_greek_model)
    model = Wav2Vec2ForSpeechClassification.from_pretrained(model_name_or_path).to(device)
    return config, processor, model, device
For the audio classification demo, I used the wav2vec2 model for classification. It takes in an audio input and outputs five scores corresponding to different emotions. The training and inference process needs two parts: processor (processes the audio waveform into tokens) and the model (uses the tokens for a downstream process such as classification). In this case, we used a processor that is trained for Greek speech audio (same used during training) and used a custom model trained for classification.
The model was developed from a cloned code from this project. The st.cache decorator on the top of the function, allows streamlit to cache the pytorch weights of the model such that this function will not need to download the weights again on multiple calls.
def demo_speech_file_to_array_fn(path):
    speech_array, _sampling_rate = torchaudio.load(path, normalize=True)
    resampler = torchaudio.transforms.Resample(_sampling_rate, 16_000)
    speech = resampler(speech_array).squeeze().numpy()
    return speech
The code above, simply loads the audio file from our test dataset and resamples them to 16 kHz which is the needed sampling rate of our model.
Model Inference
def demo_predict(df_row):
    path, emotion = df_row["path"], df_row["emotion"]
    speech = demo_speech_file_to_array_fn(path)
    features = processor(speech, sampling_rate=16_000, return_tensors="pt", padding=True)

    input_values = features.input_values.to(device)
    attention_mask = features.attention_mask.to(device)

    with torch.no_grad():
        logits = model(input_values, attention_mask=attention_mask).logits

    scores = F.softmax(logits, dim=1).detach().cpu().numpy()[0]
    outputs = [{"Emotion": config.id2label[i], "Score": round(score * 100, 3)} for i, score in enumerate(scores)]
    return outputs
The function above is the core of our application. It takes in a row from our dataframe, extracts the audio file path and correct label, and then sends the audio file to our model for inference. The model originally outputs scores called logits. Then the softmax function on line 12, converts those scores into probabilities. It returns the prediction probabilities that our model outputs as a list of dictionaries.
def bar_plot(df):
    fig = plt.figure(figsize=(8, 6))
    plt.title("Prediction Scores")
    plt.xticks(fontsize=12)
    plt.xlim(0,100)
    sns.barplot(x="Score", y="Emotion", data=df)
    st.pyplot(fig)
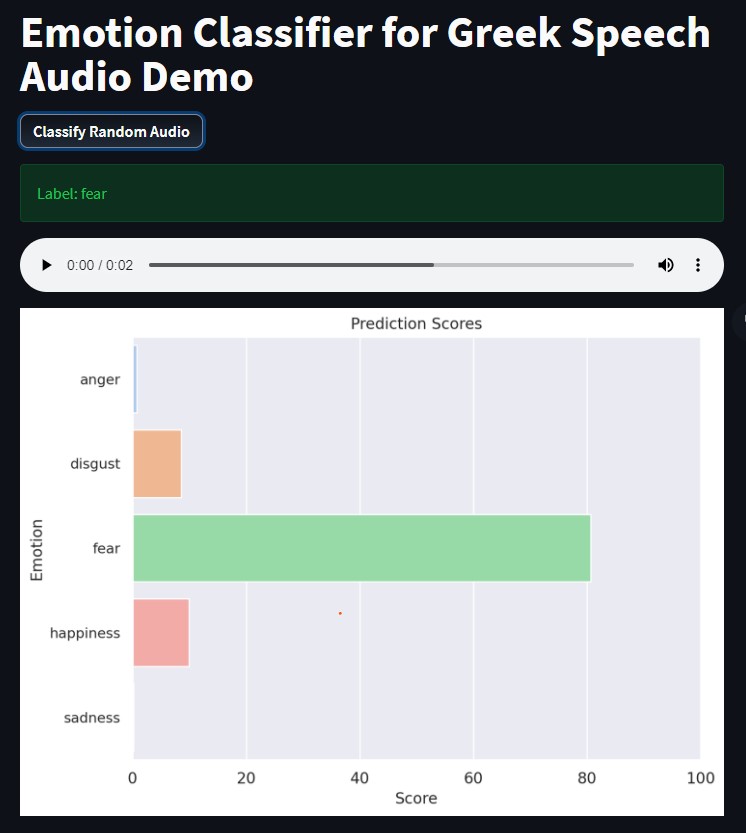
After receiving the predicted probabilities, I turn them to a dataframe, and use this function to output a seaborn bar plot. The st.pyplot command allows you to output matplotlib based figures on your application. With this, the users will not only see the final classification, but how high that probability was compared to the other categories.
Other Articles
However, to make it a little bit more scalable, the tables are defined in a separate Google sheet, and imported into the Google Colab notebook. Each node is a separate worksheet, and the columns list the parent nodes, the name of the node, and probability.
In this short project, I scraped all of Lebron's regular season points and plotted them in an interactive graph.
The rate at which unreliable news was spread online in the recent years was unprecedented. In this project, I finetuned some language models to make an unreliable news classifier.
Build an Automated ETL Pipeline. From setting up Docker to utilizing APIs and automating workflows with GitHub Actions, this post goes through it all.
The Main Function
Putting it all together, the code below is the main function of our code. As discussed before, lines 2-3 downloads the dataset only if it wasn’t downloaded yet. Line 5 loads the test data (path and labels). On line 7 we call the function to setup the model and processor. Line 10 uses st.title to display a large title in our web application. The code on line 11 uses st.button to create an interactive button that only returns True when clicked.
Lines 13-14 samples 1 random row from the test dataset. On Lines 16-20, we load the audio file into an st.audio player so the users can listen to the audio clip. Additionally, we display its ground truth label in the st.success module. Next, in line 22, we call the model to run the prediction. Finally, in lines 23-25, we create and display the bar plot of probabilities.
if __name__ == '__main__':
    if not os.path.exists('/home/user/app/aesdd.zip'):
        os.system('python download_dataset.py')

    test = load_data()

    config, processor, model, device = cache_model()
    print('Model loaded')

    st.title("Emotion Classifier for Greek Speech Audio Demo")
    if st.button("Classify Random Audio"):
        # Load demo file
        idx = np.random.randint(0, len(test))
        sample = test.iloc[idx]

        audio_file = open(sample['path'], 'rb')
        audio_bytes = audio_file.read()

        st.success(f'Label: {sample["emotion"]}')
        st.audio(audio_bytes, format='audio/ogg')

        outputs = demo_predict(sample)
        r = pd.DataFrame(outputs)
        # st.dataframe(r)
        bar_plot(r)
Here is how it looks like when loaded. Once you click the classify random audio button, the random sampling and inference process will begin. As explained earlier in the code, the user can listen to the picked audio sample, see its actual label, and then see the prediction probabilities. In this example, the model correctly predicted the label fear with a probability of 80%. Way ahead of the other categories.


Deploying your Machine Learning Application
We are already over the hardest part. Almost all of the deployment will be handled by HuggingFace. I recommend creating a requirements.txt file to instruct HuggingFace to install the same versions of the libraries that you use.
-f https://download.pytorch.org/whl/cpu/torch_stable.html
numpy==1.21.5
pandas==1.3.5
datasets==1.17.0
transformers==4.15.0
torch==1.10.1+cpu
torchaudio==0.10.1+cpu
matplotlib==3.5.1
matplotlib-inline==0.1.3
streamlit==1.3.1
seaborn==0.11.2
gdown==4.2.0
scikit-learn==1.0.2
Additionally, you may also modify the readme.md file to customize the look of your application’s title card. The emoji is the icon displayed on the title card. The colorFrom and colorTo, represent the background gradient.
---
title: Emotion Classifier Demo
emoji: 😻
colorFrom: green
colorTo: gray
sdk: streamlit
app_file: app.py
pinned: false
---
The final step would be to commit and push your code to the online repository. After that, you just need to wait for a few minutes for HuggingFace to set up the environment, install the dependencies and start running your application. Any changes that you want to apply to your application can be done by pushing new code to this online repository.
git add app.py, requirements.txt, readme.md, download_dataset.py
git commit -m "Add application file"
git push
And we are done! Just like that, we were able to transform our model from being a collection of weights, into something fun and interactive. You can share it on social media, or add it to your portfolio/resume. It will be visible publicly, and everyone can interact with your app. If you want to look at the complete code, click this link.


